Repairing a Technics SL-23 |
|
|
Home Music Tech Project Studio About Us Contact Us Bought a Technics SL-23 from eBay, and this is a short article
on what it took to get this 1976 vintage turntable running. I sold my Technics
SL-D2 Direct Drive Turntable in 1987, and it is very obvious from the current
crop of available new turntables, that they don't make them like they used
to. An old unit seemed the way to go, I expect others to realize the same.
This isn't a unit for DJs, but for making the odd CD-R from vinyl,
and just playing records like they were meant to.....
I've had some feedback on this article, and have added in additional comments that may be useful to your SL-23 version. We were originally an electronics design engineer at Fairlight Instruments in the early 1980s, refining the digital and analog electronics of their sampling music workstation, and went to Roland Corporation Japan for 15 years to be involved with things like the Roland A-50, A-80, A-880, VP-9000, R-8 human drum machine and other stuff. Contact us if you might be able to use our services, be they technical or graphic design.
Last Updated: Jan 27 2023
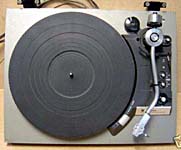
What is a Technics SL-23?
This belt drive, DC Servo turntable was the affordable model in the 1976
line up. I always thought it looked great. It has a massive S shaped tone
arm and a rather nice cueing lever. The unit wasn't popular
on eBay, so the price remained very reasonable with only one other bidding
on it. The unit was described as working order, but
that wasn't quite true.
On arrival it was found the belt was missing. A search on the web indicated it needed a 0.6mm thick, 5.16mm wide 56.9cm inside circumference belt. Dick Smith Electronics sells a pack of 11 turntable belts, and one was found to be suitable. Belt size. Measured as 24.3" The drum on the turntable is 7.8", giving a circumference of 24.5". The belt must be tight enough to not fall off the inner turntable rim, and not too tight to stretch to the drive spindle. The platter now rotated.
Connecting it to an amplifier and trying a test record, after checking
stylus weight to be 1.75gms, found that one channel wasn't working.
Opening up the unit and tracing the wiring through, found that the audio
cable as it passed through the grommet in the metal back panel was intermittent.
The grommet makes the cable pass through a U that had caused the
cable to fail over the years. Shortening the cable by 10cm and resoldering
the connections inside, on the PCB the very fine wires from the tone arm
connect to, fixed the problem. This PCB is under a metal shield plate held
by two screws. The audio cable used is very low capacitance, from the units
CD-4 compatible heritage. The whole cable could be replaced with newer
higher capacitance cable and it would not cause any problems. CD-4 is long
dead.
We now had two working channels.
The turntable has a built in strobe so that the speed accuracy can be seen,
even though the mains isn't a good short term reference. The speed stability
of 33.33rpm was suspect, and 45rpm was just terrible. Touching the fine
speed adjustment pots would stop the platter completely. Another
search on the net indicated the pots, electrolytics on the servo board
and the speed select switch have caused problems for others.
The 16mm 5k Linear pots, with fluted shafts where replaced from suitable units from Dick Smith Electronics (R 7553). Note that the shafts need trimming so the knobs do not stick up too high. The speed select, ON/OFF switch was dismantled and cleaned with electrical CO Contact Cleaner. This switch has two bolts that hold it together, making the dismantling easy. It has many small parts! Be carefull not to loose any. The speed was now not adversely effected by touching the switch or speed trimmers. They did what they were supposed to do. We were making progress, but speed stability was still a problem.
The speed was still randomly wrong. Enough to make using the unit annoying,
so the electrolytics on the DC Servo board were replaced. Electrolytics
can dry out, or leak over time, so just replacing them all is cheap and easy. It
cost all of $1.50 to buy new caps.
I used a Soldapullt and solder wick to get to the capacitor leads. Note that the leads of the caps bend flat to the PCB, so care is needed in removing them. If you apply too much heat to the PCB, you will lift tracks and need to replace the connections with wire. Modern caps are also smaller. The little PCB is mounted near the center of the turntable via two screws. There are 10 flying leads attached, but it is easy to work on the board without removing them. The Servo PCB top side of my unit is like:-
Capacitors from Jaycar Electronics used were:- 1 x RL-6410
This fixed the speed problem. Just like new. I have been informed some units have 6 electrolytics that need replacing. There may be a second 3.3uf/25V just to the right of the one in the above diagram. The unit didn't have the original headshell, but a workable, possibly better substitute. The headshell was fitted with a SANYO MG-28 cartridge and matching ST-28 stylus. The replacement for the stylus is a Goldring D.565 SR, and this was obtained at a local Hi-Fi store before playing any irreplaceable vinyl. This stylus has a conical tip. An elliptical stylus is more Hi-Fi, but we should probably change the cartridge before worrying about that, and at our age, we couldn't here the difference anyway. The cartridge alignment protractor from www.EnjoyTheMusic.com was used to mount the cartridge in the best location in the headshell. We also had to put one of the nylon washers between the cartridge and headshell to get the head on view of the stylus cantilever to be perpendicular to the record. The unit now works as intended.
I've spent more time listening to the music, looking at the beautiful album
artwork, and recalling the memories of what we were doing at the
time the music was new, than I have worrying about the turntable set up.
I have an old CBS Stereo Test Record and this unit passes all the tracking tests on it. So it seem to be set up OK. It even plays most of the records that I know skip on lesser turntables. However there is one thing to be improved, the stylus. An elliptical stylus, instead of the conical, would result in less record wear. Sanyo has never been a famous cartridge maker, and most people that did make them have gone out of business. The mass of the tone arm makes this unit unsuitable for many modern cartridges, such as the available Ortofon units. There are suitable Shure , Audio Technica and Goldring available that do have elliptical stylus, and we may look into that in the future. The Audio Technica AT95E may be the best bet. RIAA PreamplifierTo use the turntable with a computer Soundcard, a RIAA preamp based around a single LM833 opamp is used. 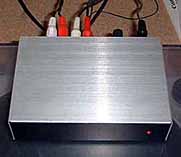
This is because a Soundcard has an AUX or LINE IN level input that does not match the output of a Magnetic Cartridge, or the way records were encoded. Modern vinyl records were not recorded with a flat frequency respone, but with an RIAA response. To get a flat response back, you use a RIAA preamplifier to reverse the effect and boost the signal to AUX levels. The PCB kit KC5159- Universal Stereo Preamplifier, from Jaycar Electronics, based on the Silicon Chip Magazine April 1994 article was the starting point. This was built into a small anodized aluminum case. We added a 7812 regulator, bypass caps, a largish electrolytic, a standard plug pack socket, 470R and small red LED power indicator, 4 RCA connector strip and a large earth binding post to make a very low noise RIAA to Line Level Preamp box. This is powered by a floating universal plug pack. To make the dual supply PCB run from a single supply, add 47K resistors from +/-15 V to ground at the PCB supply tracks so that our turntable signal earth and box use is connected to the PCB 0V, which will actually be 6V as far as the internal regulator is concerned. The regulator is bolted to the case, but insulated from it. The binding post and RCA earth conectors are also connected to PCB 0V. For recording and editing we use Cool Edit 96 and for processing and MP3 generation, Audiograbber.
Recording and ReMastering with Reaper
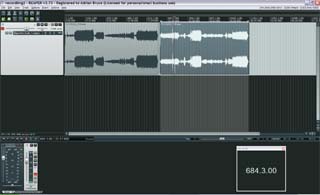
We have recently used Reaper, our Digital Audio Workstation for recording. It allows us to render out tracks as 16 or 24bit files and do loudness processing (in effect remastering) with Izotope Ozone if required. We have these tools for our own recording and mastering anyway.
Home
|