|
 View larger image of Sculpting
Overview. View larger image of Sculpting
Overview.
Character Sculpting The picture above shows some of the steps involved in
creating a small figure. The molding and casting stage
can be skipped if a polyurethane resin model is not
required. Sculpting is done in Super Sculpey, a ceramic
like modelling material. Sculpting is basically a process
of adding material that is missing and removing material
that shouldn't be there, using fine dental and wire loop
tools . Some details may be better modeled in styrene and
wire. Such as uniform details on Spock's uniform.
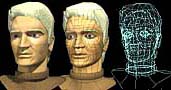
Digital sculpting in the 3D animation program
Animation Master is not quite as direct and hands on, but
in another sense, very similar. The time consuming part
of 3D is if you can not do your modelling and mesh
sculpting with a real-time 3D shaded form ( using 3D
accelerator hardware , or whatever) you have to waste a
lot of time doing preview renders to see what you are
actually doing. Animation Master does have real-time
shaded modelling, but of a reduced polygon model, so that
sculpting with clay is now probably as or more
frustrating than sculpting in 3D wire frames.
 View larger image. View larger image.
Some Characters from Science Fiction TV and Film They range in scale from 1/9 to 1/5 and have been
mostly sculpted in Super Sculpey. Miniatures can not rely
on room or stage lighting to produce natural shadows.
These effects must effectively be painted in a figure. I
use Tamiya acrylics exclusively and 2 Tamiya
airbrushes(SprayWorks and HG) and quality brushes. All
the colors I use are mixed into the empty paint jars
Tamiya also sell. The paint for the airbrush is thinned
using Tamiya thinner, but when I use brushes I just use
water, dispensed from a small 'oil can' like plastic
bottle. Getting the right mix of water and paint for
washes is critical, otherwise the wash dries as specks of
paint. The Tamiya HG airbrush is a wonderful tool.If
anyone is interested, I can put in complete 'making of'
articles on the Babylon 5 figures at some later date. In the book Building and Painting Scale Figures
it is stated that painting with oils on sculpey can
produce a white crusty surface layer at a later date. I
use acrylics and have never witnessed this problem , so I
can only conclude that Oils and Baked sculpey .are not a
good combination. The Babylon 5 figures were done when I only had a
second generation copy on VHS tape of the pilot and one
first season episode, and that resulted in quite a bit of
guess work, and less than accurate representations. Good
reference material is vital to life like, accurate
sculptures.
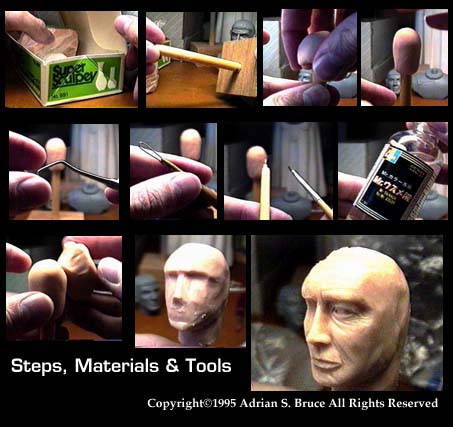
Sculpting Technique  Steps, Materials
and Tools Figure. Steps, Materials
and Tools Figure.
Here is a 'starters tools and materials ' article, as
I found the most basic of what tools and materials to buy
and where to start, missing in the format I would have
liked to have seen when I first started. There are many materials and techniques that can be
used for sculpting, but there are 2 main approaches to
sculpting used by Garage Kit figure makers. 'Form &
Carve' and 'Form & Bake' style . The two approaches
use a different set of tools, techniques and materials.
I've tried both and suggest that you don't need to. I originally started with the 'Form & Carve'
approach. 'Form & Carve' starts with a clay like material
usually called 'paper clay' in Japan. Some trade names
are 'Formo', 'La Doll' and 'Fando'. Another material that
is used the same way is Polly Putty. The various 'paper
clays' all have different properties. Some can be wetted
to allow fine detailing, but can not be sanded without
becoming fuzzy. I had tried 5 makes of 'paper clay'
before discovering that Fando has the best collection of
characteristics . These clays usually dry as you work
them and must be wetted as you work. The 'Form &
Carve' technique can be stated as.. form the material
into the very basic shape that you need. Let it dry (
overnight or a couple of days). Then with a good
selection of fine carving tools,tiny chisels,
knives,(motor tool), files and sandpaper, carve the rough
shape to what you want. Fresh clay can be added a little
at a time and detailed with dental tools ( before it drys
out and gets unworkable), or allowed to dry and carved.
Repeat until the desired form is achieved. It is a lot of
work, and a lot of elbow grease is needed to carve and
smooth the hard material if you aren't using a motor
tool. It is also rather messy. An advantage with the hard
material is that it isn't that easy to accidently damage
the form as you work. I now think the 'Form & Bake'
style is a lot easier and faster and makes no mess. The 'Form & Bake' approach uses Super Sculpey. A
modelling material made in the U.S.A. I wouldn't even
bother looking at any other material.It is a flesh
colored plasticine like material that is quite soft, but
once it is baked in an oven at 135 degrees Celsius for 15
minutes it turns hard and can be carved and sanded. That
it is very soft but can be made hard in 30 minutes or so
is very very convenient. Sculpey allows very small
quantities of material to be added easily. If you try
that with 'paper clay' the material is almost dry and
hard by the time you get around to adding it. Sculpey
also doesn't require the elbow grease, but it does
require a very delicate touch.
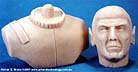
 Head being built up on stand over a hard core. Head being built up on stand over a hard core.
First point to working with Super Sculpey is that you
need wire loop tools. I wish someone had told me that the
first time I tried using it. This is used for removing
Sculpey without effecting other areas. It also allows
Sculpey to be pushed around a bit for detailing. I have
bought a collection of sculpting tools and have come to
the conclusion that you can just about make or find any
tool you need, and you don't know what tools you need
until you have used some. The mechanics of sculpting with Sculpey are : add some
Sculpey, push it around with the tools, take some off
with the wire loop tool. Repeat till required form
achieved. There really isn't any other magic too the
mechanics of sculpting. Smoothing the surface can be done
with your finger, tools, a fine paint brush (with/without
rubbing alcohol or laquer thinner) or bake it and use
sandpaper.
 Baked components, before bust is sanded and refined. Baked components, before bust is sanded and refined.
Because Super Sculpey is soft, interesting surface
textures can also be applied by making a texture pad and
pressing it to the area to be effected. A texture pad can
be made by applying several layers of latex, or in my own
case a flexible RTV putty material, to the texture you
want and producing a small flat rubber mold of it. For
example applying several layers of latex to several
square inches of an orange will allow the orange texture
to be easily applied to your sculpture to create, for
example, an alien's skin texture. A collection of such
tecture pads can be very handy. The key to sculpting, or possibly the only real trick,
is observation, and reference material. Reference
material is pictures of the object or form your sculpting
from every angle. This allows you to duplicate the
reality without guessing. Very few people work without
such photographic reference. The way hair is and falls,
joints in limbs, folds in skin, leather and cloth can all
be produced by just copying photographs of such
things. If you are doing a full figure then you need an
amature for either approach. This is just twisted wire
formed into a 'stick man' to give the modelling material
a foundation. The stickman should be lashed around the
feet wires through holes in the wooden base, so that if
the lashes are cut, the finished figure can be removed
from the base for painting or casting. When sculpting a
head in Sculpey, a basic core can be formed and baked.
This then allows the head to be built up on a solid
foundation without it sliding around when trying to work
it.
A problem to be avoided with Sculpey is that it is
very easy to damage a finished section while working on
the next unless you use a stand to support the sculpture
so that you do not have to touch it and can grip it
firmly without touching it.  Click to view Bought and home
made tools, and sculpting amature( 50k byte jpeg file) . Click to view Bought and home
made tools, and sculpting amature( 50k byte jpeg file) .
There are commercial wire loop tools by KEMPER, but I
have made small versions using stainless steel wire,
epoxy putty and disposable chopsticks. Carving styrene
and disposable chopsticks can also produce some tools
just perfect for the problem at hand. I put several coats
of car primmer on such tools to seal the surface from the
Sculpey. You end up buying interesting looking tools, but
after a while you tend to settle on just the ones that
get the job done. If you are doing a full figure, you should do the head
first and get the likeness right. The size of your work
tends to change as you work on it. The Babylon 5 Mimbari
figure started this way, but we all make mistakes! Marked
in RED is the section of the body that is too long and
out of scale. To fix it requires baking the Sculpey and
using a saw to cut out the section to correct the
proportions. The twisted wire amature can also be seen in an early
shot of a 3 legged creature from a first season Babylon 5
episode. You have to produce an amature that you can work
the Super Sculpey into and onto to form a stable
foundation. You cannot sculpt on something that is moving
around all the time. The basic wire amature with a thin
Sculpey covering can be baked once before you start on
the real detailed surface sculpting.
 Completed Spock bust
From here you need practice and patience.
Some items that may be useful
Home
Copyright © 1995-2023 Art & Technology. All rights reserved.
No reproduction is permitted without explicit written permission.
|
|
 Steps, Materials
and Tools Figure.
Steps, Materials
and Tools Figure. 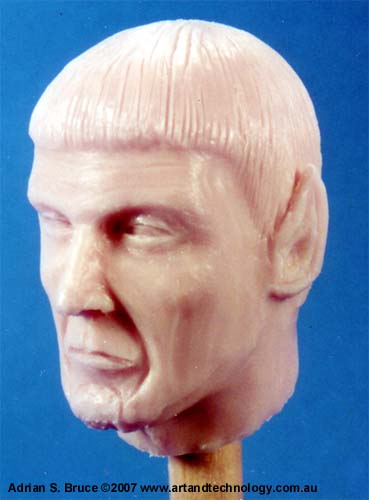 Head being built up on stand over a hard core.
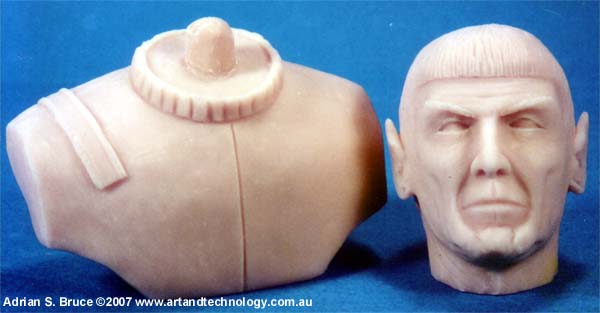 Baked components, before bust is sanded and refined.
 Click to view Bought and home
made tools, and sculpting amature( 50k byte jpeg file) .
Click to view Bought and home
made tools, and sculpting amature( 50k byte jpeg file) .  Completed Spock bust