This is an article on shielding a Fender Stratocaster. There are several articles on the net already, but I've added some local supplier sources, and point out a couple of issues with the instructions on other sites.
It also includes a section on replacing the bridge pickup with a single coil sized humbucker for even more dramatic noise reduction for that position, and include a video demo.
We were originally an electronics design engineer at Fairlight Instruments in the early 1980s, refining the digital and analog electronics of their sampling music workstation to produce the CMI Series III, and went to Roland Corporation Japan for 15 years to be involved with things like the Roland A-50, A-80, A-880, VP-9000, R-8 human drum machine and other stuff.
Contact us if you might be able to use our services, be they musical, technical or graphic design. Need graphics for the band or studio?
Last Updated: Jan 27 2023
Fender Stratocaster
Why does the Stratocaster hum?
This is because the 50 (or 60) Hz mains signal, that is all around us now, is being picked up by the electronics that lack what would be standard shielding practice today. The pickups themselves are also the worst configuration for picking up noise, being just single large coils of wire. They have a small output that also requires a lot of gain that also amplifies any hum the pickups also picked up.
So the noise comes from lack of:
(1) shielding of the internal signals and
(2) the pickup arrangement themselves.
A complete solution requires tackling both of these issues.
In this 1984~1986 E Series Fender Made In Japan Squire, there is very little shielding around the internal electronics.
It was interesting to see that there were 3 pieces of thick-ish double sided tape holding the pick guard to the body as well.
This GuitarNuts article goes into most of the details about shielding, and has various circuit diagrams that may be usefull.
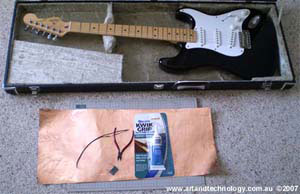
Here we are using an option he doesn't mention, Copper Shim. Copper Shim is available from Art Suppliers as it is used for creating embossed artworks. It comes on a roll, and the piece above was purchased from Oxford Art Supplies Sydney for AUS$8.40.
Stewart-MacDonald in the USA do mail order for all guitar related stuff, including copper tape. They even sell a shielding kit. Get their catalog, like I do.
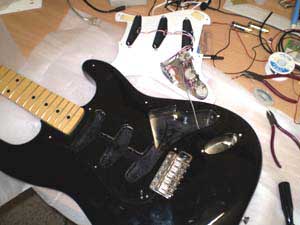
Guitar Internals
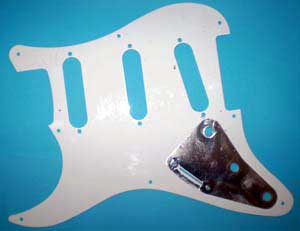
This shows the guitar disassembled. There is no shielding in the body, and only a small section of foil on the pick guard.
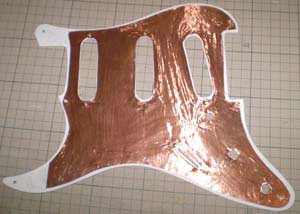
Working with Copper Shim
The shape you want is traced onto paper, then you go over that with a ballpoint pen. That leaves the impression you want to cut along. In this case, the pick guard was traced onto paper, then a line a little in from that was drawn, then that outline traced onto the shim. This was cut out with scissors and an Exacto knife.
The copper is attached to the pick guard with contact cement, Tarzan Grip. We tried the water based Kwik Grip shown in the picture on a sample of copper, but it does not stick and just makes a green/black coating. Stick with standard contact cement.
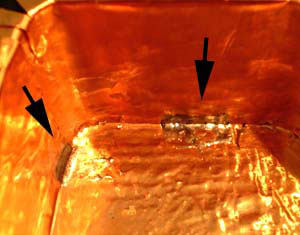
The process for lining the body cavity was to use paper to get the shape needed, then trace onto the shim. The bottom of each cavity was one piece of shim, with the edges folded up, then the sides were other pieces.
The shim is soft and is worked into corners with paddle pop sticks, the wooden coffee stirrers you get by the bag.
The shim is brought over the top of the body, and cut so that it lays flat and doesn't overlap. It is cut so that it doesn't stop the pick guard from laying flat when re-attached. Took something like 6 hours straight to get this far. About 1/3 of the shim was left over.
The different pieces of shim are soldered together to form a continuous electrical connection. I used a car electricals 120W iron. A standard electronics 22W iron doesn't have the capacity to solder the shim.
Put on a solder lug to the bridge connection and attached it to the body with a screw. A solder connection may be better.
Electronics Changes
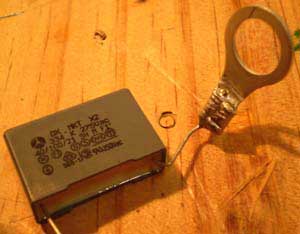
I almost didn't bother with the capacitor connection to the shielding. For any sold state amplifier and equipment, it isn't required, and a direct link would do just fine, and is the way the standard guitars are anyway. I finally decided to put one in, a 0.33uf 275VAC X2 Class Capacitor. This is an R2632 from Dick Smith Electronics for AUS$1.95. The ring terminal used is a 10.5mm H3218 from Dick Smith Electronics, with the plastic insulator cut off.
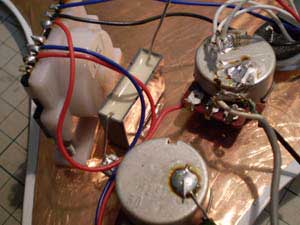
The capacitor and ring terminal fitted between the switch and pots. This picture is before all the earth connections were moved. The ring terminal went under the middle put. The other end of the capacitor became the point for all clean earth connections.
Making it Last
The cap was glued to the pick guard with contact cement. Gluing components and connection points so they do not move is standard in hostile environment equipment. You should never use electrical tape, as it turns into a gooey mess after a few years. Always use shrink wrap, or a blob of glue like Shelleys Kwik Grip. Does the adhesive on the copper tape mentioned on most sites have that issue? I don't know. I do know copper shim and contact cement will last a very long time. I have a piece of Copper Shim artwork in the foyer of a High School Hall done in the mid '70s that is still there...
The output socket recess wasn't shielded. The guitar nuts article suggests to use a short length of stereo coax to remake the connection, but forgets to mention you should connect the coax shield at the volume pot end to the ring terminal earth connection. Otherwise the lead to the socket isn't shielded.
The Results
The guitar is much quieter. The hum isn't completely gone with maximum GAIN on a CRATE amp, anyway. Trying the same tests in a guitar store on a Kirk Hammett Model Ltd with dual passive humbuckers and a Randal amp on maximum GAIN has a similar noise level. On the clean channel the modified Strat is very quiet. What you notice most is the sustain is much better, probably as you have the amp up louder, and the note doesn't fade into the noise as fast.
If you want the Strat to be really quiet, the pickups have to be shielded, as they stick a long way out of the shielded body cavity. It is possible to add shielding internally to each pickup, and bring out a wire to connect to the pick guard shield, but that would make the sound 'less bright'. Changing them to noiseless single coil Fender, Kinman or EMG unit may be a better option.
The guitar here is actually a Made In Japan Fender Squire, where there isn't an issue of 'Vintage Guitar' value being effected by the modifications. Your mileage may vary.
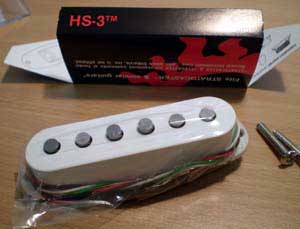
Changing the Bridge Pickup to a DiMarzio HS-3 Hum Bucker
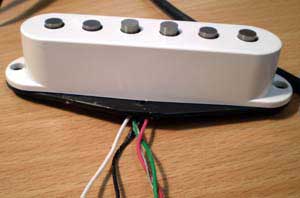
After using the shielded guitar for 10 months I decided to change just the bridge pick up to a hum bucker. Selected a DiMarzio DP117W, a white HS-3.
There are many available, but this is the one Yngwie Malmsteen puts as the bridge pick up in his strats, and is also locally available in quantities of one from Billy Hyde Music.
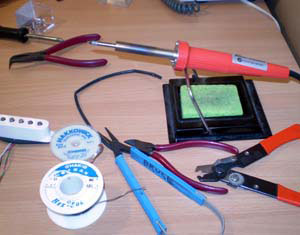
Tools Used
I wouldn't recommend anyone do this type of modification without soldering experience. The tools I used for this are shown here. The small white roll near the pick up is solder wick, used to remove solder on existing joints. You need this or a Solderpulit.
I always do this when I'm replacing the strings, so with the strings all off, I unscrew the pick guard securing screws.
Make a wiring diagram of the existing bridge pickup connections, then unsolder it, and unscrew from the pick guard. You need to keep the pickup springs as they get reused with the new pickup.
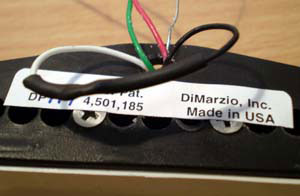
Wiring as a standard series connected humbucker
The HS-3 pickup has 5 wires coming from it. In our case we cut the white and black short and solder them together, covered with shrink-wrap, to form a normal hum bucker pickup. It needs the covering so that it doesn't short out against the internal shielding in the routed body cavity.
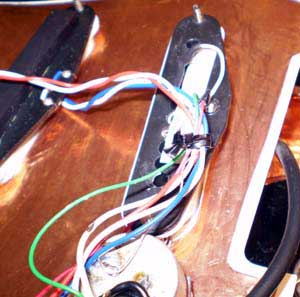
The rest of the wires are then cut to be no longer than required. The green wire then goes to the earth common, on one lead of the big capacitor we added, the bare wire goes to the shielding, and I soldered it to the back of the volume pot, and the red wire goes to the selector switch where the original bridge pickup was connected.
Result: Humbuckers are worthy of their name
The Bridge position is now hum less. Quite a dramatic change. The Dimarzio HS-3 is close to the original pickup as far as tone is concerned, but the output volume level is less. That is most evident on a clean channel, but not so with the lead channel with gain at max. Maybe more later...
Having a buzz and hum free tone, even with all out gain, makes for a much better Project Recording Studio experience.
A very high gain hum demo
With very high gain, even with shielding, single coil pickups still hum. If you don't use high gain then shielding by itself will be fine. This video shows that even with high gain, and a hum bucker in the bridge position (the switch in the bottom position), the guitar is completely hum less.
Accidentally turning the volume down when palm muting
Cutting two washes out of black felt and putting them under the volume control gives it more resistance to stop this happening unintentionally.